I've been thinking about another one of those what if''s - not like those from i1Tesla :)
What if I could re-use an old GearVR - you have to love Samsung for forcing new ones as the phones change, so I still have an old one hanging around from my Note 7 days.
My MP Mini has been a great workhorse, giving me the entry into the 3D printing realm with plenty of fun and learning experiences, although it's entry level print bed size (110x110) is just a little too small for some of the projects I need to for the Model 3.
Looked like a reasonably interesting route to allow me to still have the fun with the mini, push the print bed size and save a few $ without jumping to the $$$ point of the Prusa... I'm sure it will shout louder at me in the future, but for now the single colout mini will still surfice and after trying a small sample of TPU successfully, it was time to get cracking, get some aluminum and dig out the hacksaw ....
Purchased Parts:
Aluminum - ~$10 - local hardware store
2 x 330mm steel rods (Y Axis) - $
2 x 8mm x 400mm steel rods (X Axis) - $7 - http://a.co/d/fb6K3L4
Anycubic Ultrabase 220 x 220mm Tempered Glass base with Hotbed - $29.99 - http://a.co/d/5gyruXm
Opening the frunk is 'ok' with the app .... but it doesn't survive the simplicity test..
Simplicity is relative, as with everything, but having to dig into pocket open phone, open app or click the notification bar and then click on 'open frunk' ... wow I'm exhausted just typing it.
wondering maybe nfc, maybe bluetooth...
maybe nfc tag near the front T, atleast a tap from the phone is less than a fumble
Test the mass storage gadget - … if it doesn’t work, likely a conflicting gadget is already loaded (try checking / removing loaders from boot/configtext)
For the normal load gadget line, they should be loaded together, only difference is that the music gadget can be loaded readonly as there is no need to allow the car to have write access to it.
<TBD> .... event date stamp min vs file ... concatenated 10min 'saved-front-...' files ... contruct 360-saved... with just the front and structure for merging sides and rear - assuming they will be able to be exported by Tesla soon :)
# Path to use for re-mounting to make sure get up to date data
umountdir = "/mnt/usb_share"
#The directory to sync
syncdir="/mnt/usb_share/TeslaCam"
#Filename prefix to test for
filenameprefix="saved-"
#Uploads files in a directory
def upload_files(path, level):
fullpath = os.path.join(syncdir,path)
print_output("Syncing " + fullpath,level)
if filenameprefix:
print_output("Syncing files with prefix only: " + filenameprefix, level)
....
#Loop through the files to check to upload
for f in files:
print_output("Found File: " + f,level)
if upload == 1 and (f[:len(filenameprefix)]==filenameprefix) and (overwrite == 1 ornot f in dfiles):
... and at the bottom ...
#re-mount the folder to make sure it's fresh
def remount():
cmd = [ 'sudo', 'umount', umountdir ]
p = Popen(cmd, shell=True, stdin=PIPE, stdout=PIPE, stderr=PIPE)
cmd = [ 'sudo', 'mount', '-a' ]
p = Popen(cmd, shell=True, stdin=PIPE, stdout=PIPE, stderr=PIPE)
#Start
remount()
crontab
*/5 * * * * python /home/pi/dbupteslacam.py
Issues/updates:
possibly need to control w/r more across the gadget and the share, there are some FSCK files appearing in the root and 0 byte file minutes. (pre-dropbox addition)
check dropbox handler to make sure noop if no wifi
update uploader to a daemon / stop it just spinning up multiple instances
update / use accelerometer on pi to trigger the copy / upload.. at least it will snapshot in case user forgets to hit the button even in wifi not available....
could maybe use trigger on phone to switch on phone hotspot... then tcp - teslacampi :) - could connect and use the phone hotspot to upload
A side effect (aka bug) of PiScales not connecting to a wireless network was that after every measurement the code throws exception and restarts, so it was a quick ... read before reboot...
- in this case the non connection to wifi was great for this otherwise fitbit would have added a few lbs to my weight tracking :)
So weighed myself and then holding the bike... with some simple maths ....
The thought of manually typing in my daily weight into fitbit just didn't sit well.
Manual / Repetitive.
Sure fitbit have their custom scales, but where's the fun in that.
Have been experimenting the great wiifit raspberry pi tutorial form initial state..., but it was a little too much functionality / not quite what I wanted and bluetooth was playing games with me - I could easily set the code in a loop and cause too much 2.4G(assumption) noise that it messed up my local wifi , so the whole thing sat on the shelf for quite a while...
I want something that where I can turn on / off easily and ideally give clear visual feedback on what the measurement was that day with some nice small display, have the ability to measure a few times, not have to drag too many things around (too many boxes connected) and not having to switch things on / off and wait too long....
with the pi zero w released and displays getting still cheaper and custom fit to pi zero, it's time to start looking again.
have ability to plug into micro usb and leave plug not affecting light functions
auto switch on / off
auto brake light
...
Research options:
LED Bike Brake Stop Running Tail Light Rear Brake Lamp TURN SIGNAL LAMP HY10 http://r.ebay.com/ye7l2Z
FCC certified, rechargeable 4-in-1 smart bike taillight that turns on and off automatically, brake signal when bike slows down abruptly, SOS distress light, and optional theft-deterrent alarm.http://a.co/a6Z5JRK
Spent a couple hrs riding up and down street :) Clearly I'm a bike novice, not used to hearing and correlating issue sound.
Plenty of trial runs with changing gears, changing PAS levels... Managed to get into a consistent mode where I could always make the 'jumping' happen. The gear selection needed to be in the highest gear (8) and a reasonably high PAS level 8/9.
Leaving in gear 7 resulted in plenty of clean runs, but moving into 8 the problem came back.
Tried to make some video's, but I couldn't hold it still enough to see what was happening, just hear..
So what was the issue...
Main fix was aligning derailer gears! Clearly with motor it's more important for them to be perfect. With all the quick release of rear wheel it gear alignment moved enough to cause problem. So gears we're still changing after the auto gear selector had dropped the power and reengage, thus causing chain skip, which I'd not experienced before, this thinking motor skip.
This time, I spent a fair amount of time aligning the gears and also aligning the deraileur hanger - quick view it didn't look out, but it was slightly, so bend it back to true manually. These tutorials from Park Tool and RJ the Bike Guy are very helpful, and with my hanger only slightly out - manual bending with some grips, although tough, worked out enough for me.
Then spending the time aligning all the gears - more helpful park tool videos -
Definitely recommend, going back and forth on the setting multiple time to turn them as best as possible since clearly with the motor it's even more sensitive.
With that complete, definitely the shifting was amazingly cleaner, could feel the gear selector working well and it was back to be a dream ride ... although 8th gear still caused a couple of chain slips during the couple miles of testing.
Lubed all the chain and gear set up, and yippee - all smooth now.
Amazing for me - was a great learning experience - gear alignment is important and recognition of audio chain jumping :) soooo pleased not to have to crack open the motor casing.
Funny thing also happened with support... I'd finally got desperate enough late Friday to raised a support ticket request with lunacycle.com. Support excellent as usual, Scott from Lunacycle got back to me on Saturday with a request to check my derailleur alignment lol - what a star - typical.
All is still not perfect with the throttle as it cuts periodically, usually at speed, so am thinking maybe it's just tripping a limit as once I disengage the throttle and re-engage, all works again ...
I don't throttle much, so will loot at that one another day.
with all the work on the bike, I decided time to invest in a bike stand, starting to like the idea of being able to stand up, not having to worry about balancing the bike or rocking back and forth on the kick stand in order to spin front or read wheels.
That and now realising that I'm gonna have to pull the motor apart - the continual skipping when under torque has got me a little worried that I have some wear on the gears already (even though I think I'm just around the 400mile mark on the odometer).
looked for about 20mins and decied to give the buzzrack eco workstand (http://a.co/i7t1AGb) a try. Was one of the cheapest at $39.90, but I also liked the fact that it didn't have a clamp, just clever hook arrangement with the seat and seat post.
works great, needed to raise the seat in order to give it the leverage space and it doesn't have height adjust or tray for bits, but working great for me so far...
<< need to add piccy>>
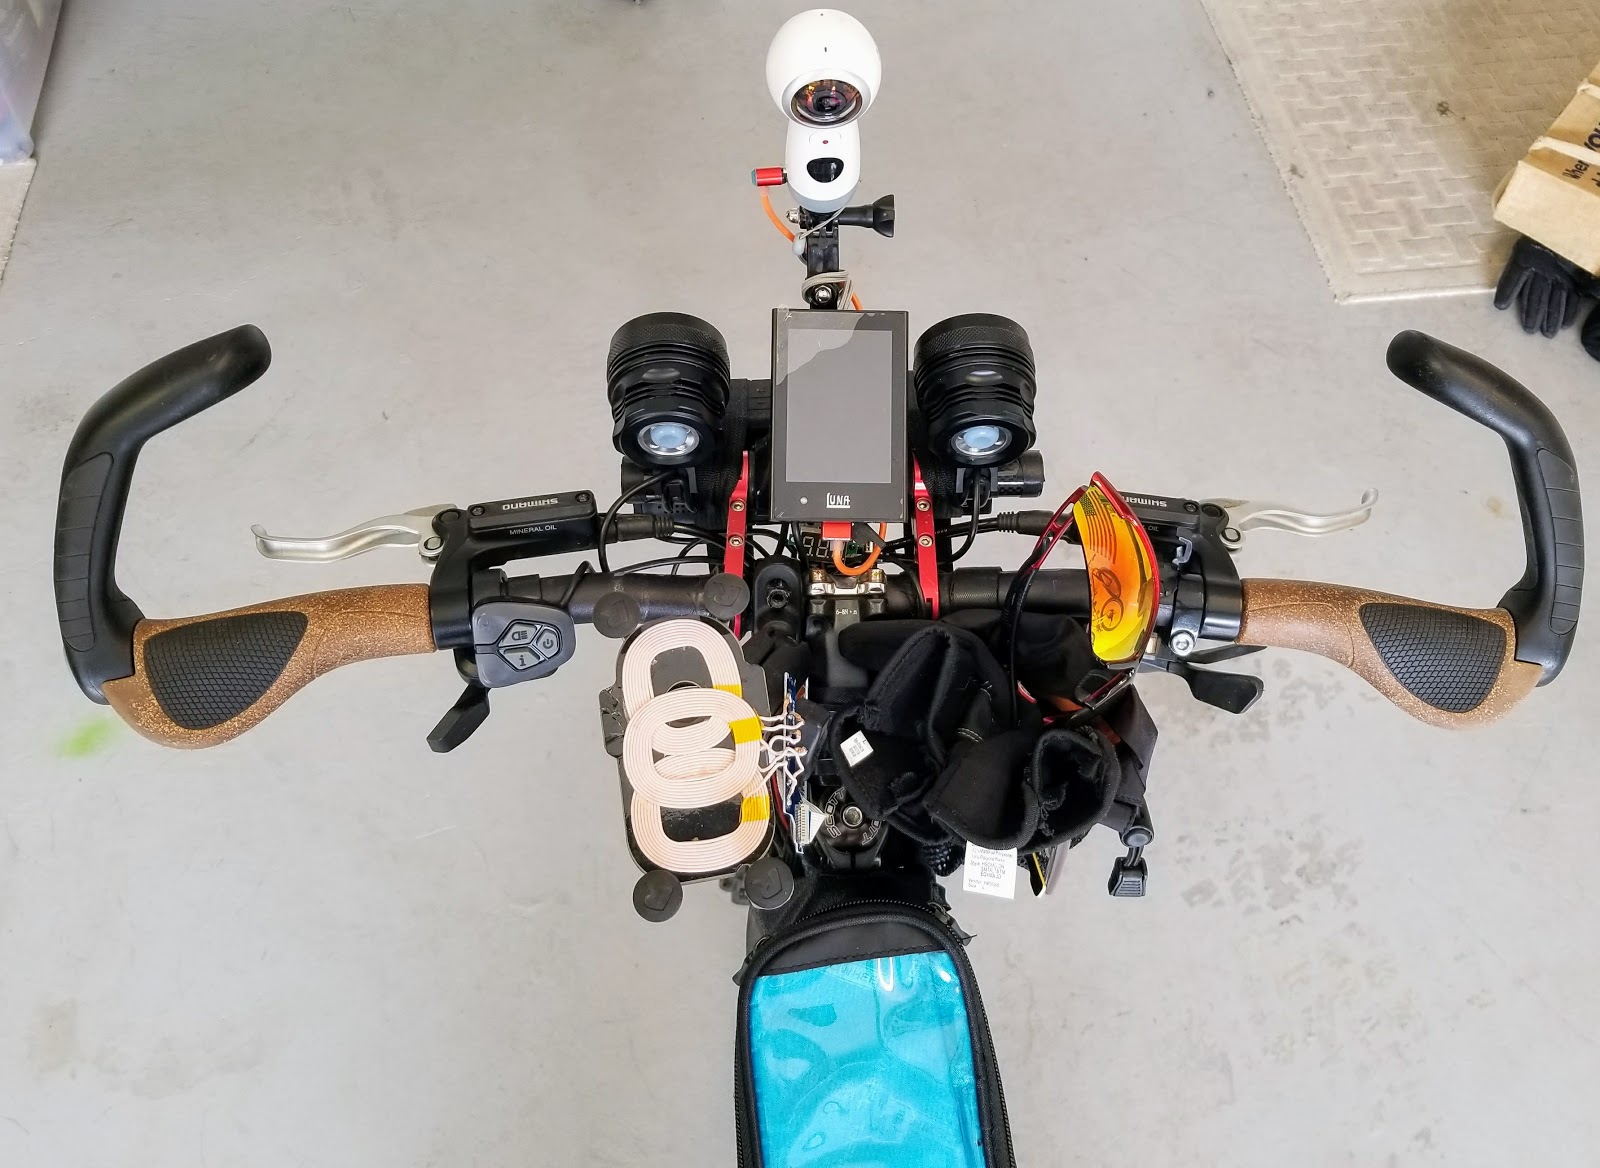
Refactored handlebar today...
Another great find - sticky tape :) Silicon self fusing tape (http://a.co/buowzTg). With constant pain of peripherals moving on the handle bars as the rotate / slide round, even fully tight. or in the case of the red extension, even the central grip worked it's way loose and out. So what I needed was some decent tape that would bond and have some decent grip. This stuff is great, different to get used to as it stretches, doesn't stick to much, but boy when it gets with it'self - yep it sticks, holds together and provides a nice slight grip surface to stop those rolling brackets. It's not cheap @ $10 for 10ft - so gonna look for larger cheaper roll now, but it's certainly worth it so far - will keep eye on it over next couple of months while in use
Moving the brackets to the centre allowed them to be more perpendicular to the handlebar to help static grip. Added some silicon tape on the light also to stop them rolling around hopefully. With the vibrations, last week or two I managed to loose the plastic infil for the left bracket, so took some cut up garden hose, wrapped it and am trying that for the grip/padding.
Technically is it the motor? not actually sure and I suppose, possibility is low, more likely some of the support around it as motors are pretty simple at the end of the day :)
So over the last few days, I've been using the throttle and higher level PAS - instead of the usual 3-5, more like 6-9, which I figure has pushed the power up on the drive. Which correlates with the display showing me close / at 750 at times.
Problem is I'm feeling the pedals jump, initially I thought it was delay gear shifting as the feeling through the pedals is similar, but then it was clear that it was happening even when I'd been static gear selection for a while.
It definitely occurs when the demand/assist is higher, and will occur few times a minute if I just use the throttle.
Thinking a little :) this may well have evolved from creaky cranky
As I have the news in my eyes on my commute, I don't hear any noises, so it may have been there for a while I suppose.
Looks like it's time to have to pull the motor housing apart...
youtube media hunting time and lunacycles forum too....
Thanks to Don over at NovaSpritTech for another great video, I became aware of the DietPi distribution.
Intrigued me again as something for Ethan to practice on, so we setoff on that direction, but then as I looked through all the goodies that DietPi has to offer, noticed there was a couple of options for camera monitoring.
Played with the dietpi native camera package, but it wasn't that stable. Moving onto the motioneye version, things changed...
It worked out of the box, I didn't see the need to put a password on as it's all internal local lan anyway. It handled both a standard pi-camera module and a Logitech C300 simultaneously without issues.
It even has built in options to upload to dropbox, google or others. Googled-rive using a hash api token to use google drive, so no password username worries.
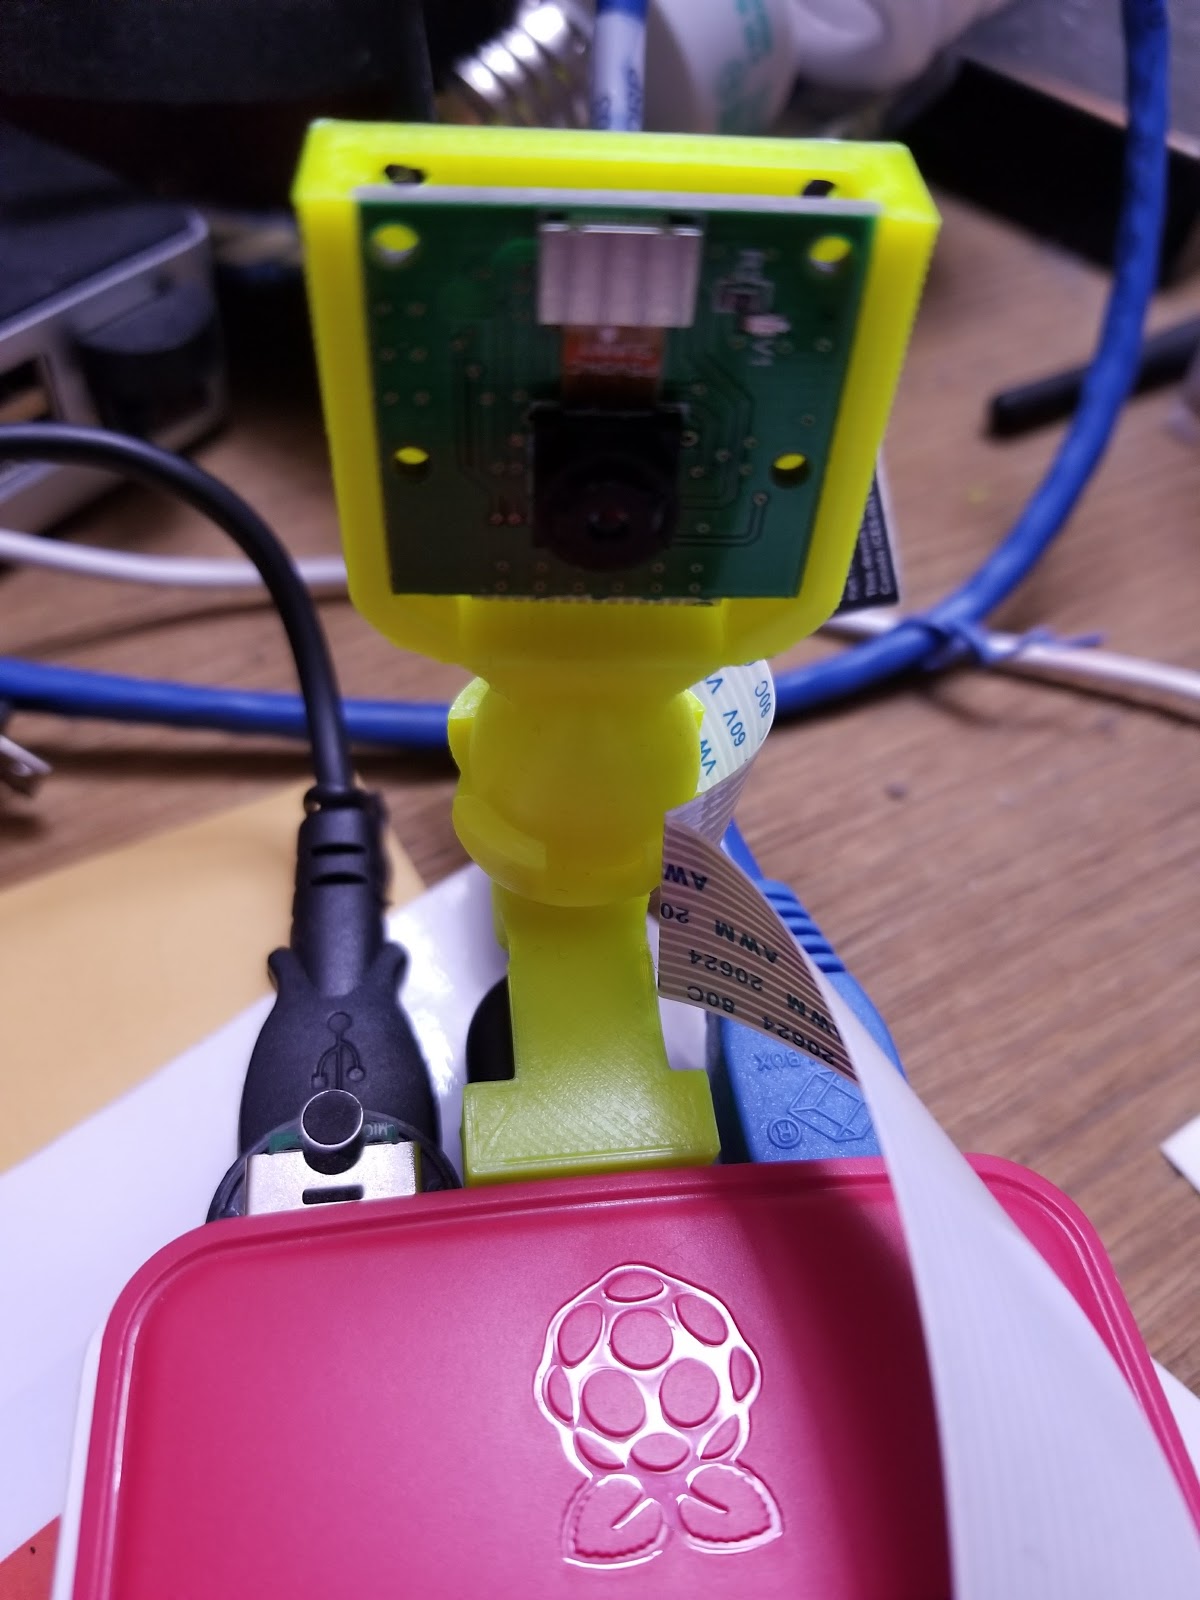
With the capture running it was then time to look for case / mount .. so off to tinkercad.
There are so many bits on thingiverse, but relatively quickly found this and this which was awesome and eay so the camera can be mounted using the ethernet socket as a project bracket hole :)
Those with a keen eye, will notice its in the usb socket not ethernet, well that's becuase finding another model doing some model merging in tinkercad and the usb mount was born
Did make a tweak to the socket size to shrink it slightly since the original module yieled parts with knuckle joints were too small, so needed to work out alternative.
Resultant fix was simply by growing the ball (by 1m diameter) and for each joint link. and expanding the socket up (by xxmm)
Now to take a crack at using DietPi to get an openvpd server up and running....
Update: 12th Feb:
When pushing the changes back into thingyverse, noticed the author has placed his files on tinkercad - awesome - so ...