Wednesday 21 November 2018

Alice thru the looking glass... or maybe not Gear VR


I've been thinking about another one of those what if''s - not like those from i1Tesla :)

What if I could re-use an old GearVR - you have to love Samsung for forcing new ones as the phones change, so I still have an old one hanging around from my Note 7 days.

What if I could re-use an old GearVR with the drone for FPV instead of indulging in some of those lovely Epson Moverio BT-300FPV Smart Glasses...
Stumbled across this video and looks like there are a few of them, to basically drill out one side of the Gear VR clamps....


Was thinking, what if we could hack one of the modular connectors on the other side, keep the clean un-drilled out look?
As it happened I had a spare connector, so out came the multimeter to determine pinouts and the handy soldering usb pen....

Parts / Links:


https://www.electroschematics.com/4856/usb-how-things-work/


Oops! D- and D+ round the wrong way first try - great use of a multimeter :(


Swapped round - Green / D+ on the top row next to the 5V

Some good ol' hot melt glue

Couple of layers of heatshrink moulded to nicely bend round


Bingo! FPV with the aid of the Litchi app ( Google Play )


Thursday 15 November 2018

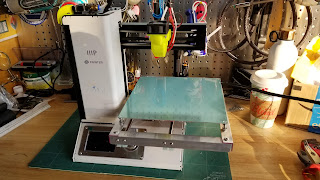
Need a bigger print bed... love Prusa mk3... still love my MP Mini

My MP Mini has been a great workhorse, giving me the entry into the 3D printing realm with plenty of fun and learning experiences, although it's entry level print bed size (110x110) is just a little too small for some of the projects I need to for the Model 3.

The Prusa i3 MK3 keeps shouting out to me to buy it, but then I stumbled across a few more hacking links for the MP Mini....
https://codingwithspike.wordpress.com/2017/08/18/mp-select-mini-extended-bed-part-1-y-axis/

Looked like a reasonably interesting route to allow me to still have the fun with the mini, push the print bed size and save a few $ without jumping to the $$$ point of the Prusa... I'm sure it will shout louder at me in the future, but for now the single colout mini will still surfice and after trying a small sample of TPU successfully, it was time to get cracking, get some aluminum and dig out the hacksaw ....

Purchased Parts:


  • Aluminum - ~$10 - local hardware store
  • 2 x 330mm steel rods (Y Axis) - $
  • 2 x 8mm x 400mm steel rods (X Axis) - $7 - http://a.co/d/fb6K3L4
  • Anycubic Ultrabase 220 x 220mm Tempered Glass base with Hotbed - $29.99 - http://a.co/d/5gyruXm
  • 5 Meters GT2 6mm Width 2mm Pitch Timing Belt - $6.99 - http://a.co/d/bUC0cZx
  • Rivet Gun & w sample rivet pack - $8.66 - http://a.co/d/hoDgyua

Printed Parts:


Using the old bed as the template is great - but use it round the correct way i.e. not this way !
The difference is that you will have the slots for the timing belt aligned correctly :)


Wednesday 7 November 2018

Can we make it easier to open that frunk?

Opening the frunk is 'ok' with the app .... but it doesn't survive the simplicity test..


Simplicity is relative, as with everything, but having to dig into pocket open phone, open app or click the notification bar and then click on 'open frunk' ... wow I'm exhausted just typing it.

wondering maybe nfc, maybe bluetooth...


maybe nfc tag near the front T, atleast a tap from the phone is less than a fumble

Brian at i1Tesla had the awesome idea for raising the trunk when it opens, go check his YouTube channel out here.